ESF AWS Cloud Endpoint
Prerequisites
- AWS IoT account
- ESF 6.1.0+
The ESF AWS Cloud Endpoint is a specific ESF Cloud Connector based on the AWS IoT SDK v2.0. This connector uses the ESF APIs and the AWS IoT SDK to simplify the application development and connectivity to AWS IoT Core and to AWS Greengrass. Furthermore, out-of-the-box, it supports Classic Device Shadows and Named Device Shadows. This allows ESF Assets to map to AWS IoT Core or to AWS Greengrass seamlessly.
The following steps are needed to properly configure the just created AWS Cloud Connection.
AwsCloudEndpoint Configuration
It is possible to change the gzip payload compression by changing the value of the encode.gzip parameter. This property defaults to false.
AwsDataService Configuration
Please refer to the DataService Configuration page to get more details on the configuration parameters available for this service. Make the use-case specific changes to the service and click the Apply button to save them.
MqttDataTransport Configuration
-
Set the broker URL in the MqttDataTransport-AWS tab, it can be obtained from the AWS IoT Web Console clicking on the Settings entry in the bottom left section of the page, the URL will look like the following:
Hint
A secure connection to the AWS IoT Core broker is established by default. The AWS IoT Core service does not support unencrypted connections.
-
Enter the thing name in the client-id field (in this example
kura-gateway). This will replace{thing_name}in the message topics (see Supported AWS Device Shadow MQTT Topics) -
Ensure the setting for lwt.topic under MqttDataTransport-AWS does not contain the $ character. This is required because of the fact that AWS IoT Core does not support topic names starting with
$(except for the$aws/hierarchy). -
Enter the
xxxxxxxx.certificate.pem.crtcertificate to the Device Certificate field.Hint
This step uses the keys and certificates generated during the provisioning phase in AWS IoT Core service. See section Single Thing Provisioning for reference.
-
Enter the
xxxxxxxx.private.pem.keyprivate key to the Device Private Key field.Hint
This step uses the keys and certificates generated during the provisioning phase in AWS IoT Core service. See section Single Thing Provisioning for reference.
-
Copy the AWS CA to the Broker CA Certificate field.
-
Update the keep-alive parameter. This value specifies the frequency (in seconds) for the periodic MQTT PING message
- Update the timeout parameter. This value specifies the timeout (in seconds) used for all the interactions with the MQTT broker
![]()
Connect Device
Make sure the AWSCloudEndpoint instance is selected from the list in the top section of the page and click on the Connect button, if the connection to AWS IoT platform succeeds the Status of the instance will be reported as Connected.
Managing Publishers and Subscribers
This custom connection to the AWS IoT Core service contains specific subscribers and publishers with their own distinct behavior.
- ThingPublisher - specific for telemetry data. It allows the user to specify the target topic for the data managed by this subscriber.
- ShadowPublisher - specific publisher for AWS Thing classic and named shadows. See Using device Shadows for the possible shadow operations supported by this publisher.
- ThingSubscriber - a generic subscriber component that allows to subscribe to configurable MQTT topics.
- ShadowSubscriber - subscribes to the predefined AWS shadow topics as explained here.
Tip
Reference Supported AWS Device Shadow MQTT Topics for the implemented shadow topics that are available to use for the ShadowPublisher and ShadowSubscriber.
Creating and Managing ThingPublisher and ThingSubscriber
- From the Cloud Connections tab in the left panel, select the AWS connection and then click on the New Pub/Sub at the top of the page.
-
Select the
com.eurotech.framework.aws.mqtt.cloudconnection.publisher.AwsThingPublisherfrom the drop-down. Give a unique name to the publisher instance in the New Publisher/Subscriber PID field, such asthing.publisher, then click the Apply button to create the AwsThingPublisher.
-
Click on the New Pub/Sub button again and select the
com.eurotech.framework.aws.mqtt.cloudconnection.subscriber.AwsThingSubscriberfrom the drop-down. Give a unique name to the subscriber instance in the New Publisher/Subscriber PID field, such asthing.subscriber, then click the Apply button to create the AwsThingSubscriber. - Select the
thing.publisherinstance and define a topic to publish to, e.g.test-topic. With this publisher the user can also decide the publishing QoS. By default the publisher sets the QoS to 0. - Select the
thing.subcriberinstance and define a topic to subscribe to. This will be any message sent from the AWS IoT Core broker filtered by this defined topic. Let's use the wildcard#under our published topic, e.g.test-topic/#. This will receive any sub-topic under thetest-topictopic.
AWS Reserved Topic Starting Character
Do not attempt to publish or subscribe to any topic beginning with the $ identifier (except for the $aws/ hierarchy). This will result in a terminated connection by the AWS IoT Core broker since this is considered a reserved identifier by AWS IoT Core.
Reserved Topics
Do not attempt to publish to any of the following topics using the Thing publisher. This will erroneously identify your message as a Shadow message instead of a Thing message and lead it to being published on the reserved shadow topics with undefined behavior.
shadow/updateshadow/deleteshadow/name/.+/getshadow/name/.+/updateshadow/name/.+/delete
.+ represents 1 or more of any character(s)
Device Shadow Management
AWS IoT Core maintains a "shadow" for each device registered to its service. More information on device shadows can be found at AWS IoT Device Shadow service.
- Follow the same procedure as in previous paragraph to create a new shadow publisher and subscriber.
- Select the
com.eurotech.framework.aws.mqtt.cloudconnection.publisher.AwsShadowPublisherfrom the drop-down. Give a unique name to the shadow publisher instance in the New Publisher/Subscriber PID field, such asshadow.publisher, then click the Apply button to create the AwsShadowPublisher. - Select the
com.eurotech.framework.aws.mqtt.cloudconnection.subscriber.AwsShadowSubscriberfrom the drop-down. Give a unique name to the shadow subscriber instance in the New Publisher/Subscriber PID field, such asshadow.subscriber, then click the Apply button to create the AwsShadowSubscriber. -
When selecting the
shadow.publisherinstance, as depicted in the following image, the user can configure the shadow topic from the available options:
See the section Supported AWS Device Shadow MQTT Topics for the specific topics each function subscribes to.
-
Enter a Shadow Name if desired. Classic shadows will be used if Shadow Name is left blank.
-
Select the
shadow.subscriberinstance and define the shadow topic for the device to subscribe to. Once again, this is a predetermined list understood by AWS IoT Core. Select thegetoption from the drop-down.
See the section Supported AWS Device Shadow MQTT Topics for the specific topics each function subscribes to.
-
Enter a Shadow Name if desired. Classic shadows will be used if Shadow Name is left blank.
Initiate MQTT Traffic from Device
An efficient way to communicate with a cloud platform in ESF is by creating components in ESF Wires to send and receive MQTT data.
-
Click on Wire Graph in the left panel of the ESF Admin Webpage, you should see this screen:

-
Select the Timer component and add to the graph. Give this timer component a unique name, e.g.
timer1. - Select the Publisher component and add to the graph. This will be an AwsShadowPublisher so give this a unique name for the shadow topic that will be published to, e.g.
shadow.get.publisher. - Select the Subscriber component and add to the graph. This will be an AwsShadowSubscriber so give this a unique name for the shadow topic subscribing to, e.g.
shadow.get.subscriber. - Select the Logger component and add to the graph. This will be for the
shadow.get.subscriberto notify when a message is received on the specified AWS shadow get response topic. Give the logger a unique name, e.g.logger1. - Select
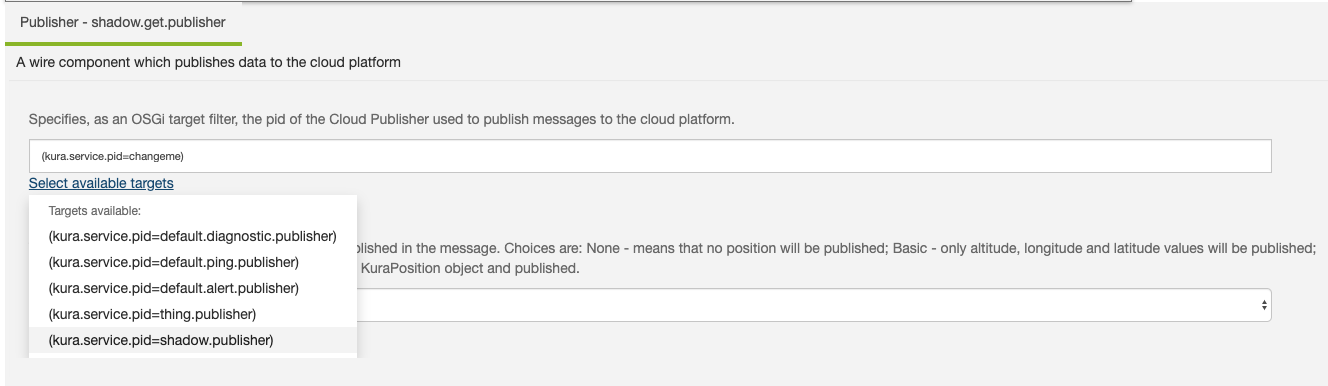
shadow.get.publisherand set its CloudPublisher.target to the pid of theshadow.publisherinstance created previously. -
Set the publish.position to Basic to publish the basic information of our device to AWS IoT Core.
-
Select the
shadow.get.subscriberand set its CloudSubscriber.target to the pid of theshadow.get.subscriberinstance created previously. - Select the
logger1instance and set its log.verbosity to VERBOSE to log all information received from AWS IoT Core for this device. - The timer interval default to interrupting every 10 seconds, that should be fine for these purposes but you can change the interval by selecting
timer1and changing the simple.interval period. It is highly recommended NOT to change the interval type from SIMPLE. - Connect the
timer1output to theshadow.get.publisherinput and connect theshadow.get.subscriberoutput to thelogger1input. - Click the Apply button to save the changes.
Hint
You may disconnect the Timer output from the Publisher input at any time to stop publishing to listeners. You may also create multiple Publisher and Subscriber instances and connect them to the respective components to publish or subscribe to multiple topics.
Subscriber Wire Record Metrics
Several metrics are available in the wire records produced by the subscribers.
| Method | Description | Notes |
|---|---|---|
| TOPIC | The topic the message came in on | |
| THING_NAME | The name of the Thing that the message came in on | This is useful to differentiate the message sources if you have more than one Thing connection with identical Thing subscription topics. |
| ERROR | The error message provided by AWS | This is only included for shadow reject messages (received on a shadow /rejected topic) |
Raw MQTT Message Metric
ESF 7.0.0 or Greater Only
The Raw MQTT Message Metric feature is only available in ESF version 7.0.0 or greater.
Wire Graph Only
The Raw MQTT Message Metric is only available when using the subscriber in the Wire Graph.
Thing subscribers (but not shadow subscribers) can output the raw MQTT message that was received as a wire record metric. To enable this:
- Select the thing subscriber on the Wire Graph
- Enter a metric name into the Set property from message body property. This will be the metric name used in the wire record.
- Set Body property type to String.
- Apply the changes
The raw MQTT message that was received will now be output in the wire record as a metric with the name entered into the Set property from message body.
Hint
The Set property from message body property is only available when selecting a subscriber wire graph component. This property will not be shown in the subscriber properties on the cloud connections page.