DynaGATE 10-14

Document Revision History
| Revision | Date | Notes |
|---|---|---|
| 1.0 | 10/10/2023 | Initial release |
| 1.1 | 03/18/2026 | Updated documentation |
Applicable operating systems for this guide
To configure the DynaGATE 10-14 you need any PC with an operating system that features a modern web browser (Chrome recommended) and a SSH client to perform troubleshooting (i.e. Putty for Windows OS or ssh command line on Linux Shell or Windows Powershell)
Overview
The DynaGATE 10-14 is an E-Mark certified Edge Gateway for Public Transport and Road Vehicles that enables a fast transition to ITxPT VCG both in existing and new deployments.
The DynaGATE 10-14 consolidates multiple devices in one, with significant savings while dramatically simplifying the installation and the interoperability challenges; DynaGATE 10-14 packs all the functions that would require dedicated GNSS units, Wi-Fi/BT to 5G and LTE routers, IP camera processors, bidirectional CAN-FD and HW Read-Only CAN (factory option) controllers. Support for up to 4x RES-232/422/485 serial ports allows compatibility with legacy devices, making it possible to transition more gradually to a pure ITxPT vehicle architecture.
The DynaGATE 10-14 combines a rugged IoT Gateway with an AI and Computer vision platform: for instance, IP and GMSL 2 (factory option) video feeds from vehicle cameras can be processed by the integrated 2.3TOPS AI accelerator.
The DynaGATE 10-14 is a global product, certified by major LTE carriers and ready to deploy in North America, Europe and Japan; additional 5G and LTE cellular operator and country certifications are available as a professional service.
Cutting-edge cybersecurity is often a critical requirement: the DynaGATE 10-14 is RED-DA and PSA 1 certified and can even be certified according to IEC 62443-4-2 cybersecurity (Professional Service). System integrity and authenticity against unauthorized manipulations is layered across hardware and software: at the hardware level TPM 2.0 and an innovative, always-on, power-independent hardware antitamper monitor assure that the system has not been manipulated and that its sensitive data are safe. At a higher level, technologies such as Secure Boot and ARM Trust Zone expand the protection perimeter to the whole system.
The DynaGATE 10-14 comes with Everyware Software Framework (ESF), a commercial, enterprise-ready edition of Eclipse Kura, the open source Java/OSGi middleware for IoT Edge Gateways. Distributed and supported by Eurotech, ESF supports ready-to-use field protocols (including Modbus, OPC-UA, S7), MQTT connectivity, web-based visual data flow programming and deep configuration. ESF is also integrated with Everyware Cloud (EC), Eurotech Cloud Platform enabling advanced diagnostics, provisioning, and full remote device access and management.
Hardware Description
Datasheet
Standard Kit Contents
Depending on the order code, you will receive the device ready to be powered on with no additional hardware. If you ordered a DevKit, you may also order a Power Supply for your region, and the required accessories to start operating with your device.
Visit the product page for info on ordering codes.
User provided items
A PC (Windows, Linux or Mac OS) with an Ethernet port and an Ethernet cable or, where applicable, Wi-Fi(TM) to connect to the device.
3rd Party purchasable items
If not included in the DevKit, an AC-DC Power adapter, 24V, 24W is required.
Example items:
Custom Configuration
Eurotech configuration management service allows fine tuning the device to meet and exceed your project requirements; Examples of personalized configuration include customer branding (with logo and custom colors) and can go to deep customization with a range of options for project specific requirements (such as frame grabbers, choice of internal components, etc.): call us for more information on configuration management options.
Set up Your Development Environment
Operating System
Your device runs Eurotech Everyware Linux, an optimized version of Yocto Linux OS specifically aimed at supporting industrial environment.
Tools Installation
The device is distributed with the latest version of ESF already installed and ready to start.
In order to develop and deploy applications on ESF, you can follow the dedicated guides on ESF official documentation - development environment setup.
If you need to build your native applications on this target hardware, please contact us to receive the latest toolchain.
If you need to build your containerized applications on this target hardware, please check the container orchestration guide
Additional References
Detailed documentation on the features provided by the available services running on the device can be found in the ESF official documentation.
Set up Your Hardware
Front Side Overview

| Ref | Description |
|---|---|
| 1 | HDMI OUT connector |
| 2 | 2x Host USB ports (USB 3.0 Type A; USB0 on the bottom; USB1 on the top) |
| 3 | Audio Interface |
| 4 | Power IN connector |
| 5 | Earth connection terminal |
LED Indicators Overview


| Ref | Description |
|---|---|
| 1 | Internal Cellular Modem activity (Green) |
| 2 | General purpose LEDs: USER1 and USER2 (Bi-color Green / Yellow); USER3 and USER4 (Bi-color Green / Red) |
| 3 | External power source status (Blue) |
Rear Side Interfaces Overview

| Ref | Description |
|---|---|
| 1 | Digital IN/OUT and Analog IN |
| 2 | Serial port COM0 |
| 3 | Serial port COM1 |
| 4 | Ethernet port ETH0 |
| 5 | Ethernet port ETH1 |
| 6 | CAN ports CAN0 |
| 7 | CAN ports CAN1 |
| 8 | Antenna connector for GNSS |
| 9 | Antenna connector for Wi-Fi/ Bluetooth |
| 10 | Diversity antenna connector for internal cellular modem |
| 11 | Main antenna connector for internal cellular modem |
Setup Your AWS Account
Refer to the online AWS documentation at Set up your AWS Account. Follow the steps outlined in the sections below to create your account and a user and get started:
Pay special attention to the Notes.
Create Resources in AWS IoT
Refer to the online AWS documentation at Create AWS IoT Resources.
Follow the steps outlined in these sections to provision resources for your device:
Install the AWS CLI or use the CloudShell
To install the AWS CLI on your host machine, refer to the instructions at Installing the AWS CLI v2. Installing the CLI is needed to complete the instructions in this guide.
Once you have installed AWS CLI, configure it as per the instructions in this online guide. Set the appropriate values for Access key ID, Secret access key, and AWS Region. You can set Output format to "json" if you prefer.
Alternatively, you can use the AWS CloudShell to send the same AWS CLI commands directly from your browser.
AWS IoT Core Connection
This section provides a guide on connecting an ESF device to the Amazon Web Services (AWS) IoT platform. This guide covers the usage of the ESF Cloud Connector for AWS IoT Core and other integrations with AWS IoT services like AWS Greengrass.
Prerequisites
In order to connect a device to AWS IoT Core, the following prerequisites are needed:
- An AWS IoT account
- A device with ESF version 3.3 or greater installed
Provision the Device with credentials
AWS IoT Core supports three types of provisioning:
- Single Thing Provisioning
- Just In Time Provisioning (JITP)
- Bulk Provisioning
You can find detailed instructions on Single Thing Provisioning in the ESF documentation website. JITP, Just In Time Registration and Bulk Provisioning require custom setup, usually involving a discussion with one of our Solution Architects. Please feel free to contact us if you need to enable JITP, JITR or Zero-Touch Provisioning on your Eurotech device.
Connectors Available
Two alternative ways can be used to connect to AWS IoT Core from ESF:
- Using the ESF Cloud Connector for AWS IoT Core (Requires ESF 6.1.0+)
- Configuring the Generic ESF MQTT Connector (Requires ESF 3.3.0+)
Both ESF Connectors support all three provisioning techniques.
Device power-up and connect
Please refer to Eurotech Quick Start Guide for DynaGATE 10-14, which covers all the steps from unboxing, power up, network setup, and zero-touch provisioning to Everyware Cloud and AWS IoT.
After completing step 4 in the Eurotech Quick Start Guide for DynaGATE 10-14, please come back here to build the demo application.
Completing device provisioning is a prerequisite before an IoT device can successfully connect to AWS IoT Core.
Running the demo
ESF Wires can be leveraged to create a simple demo flow to test the connection to AWS IoT Core.
- Open the ESF Web Console, by accessing ESF from your browser.
- Login with your credentials (default credentials can be found in the ESF documentation)
- Navigate to the Cloud Connections section of ESF
Once your Eurotech device is connected to IoT Core, the relevant ESF Cloud Connector will look as follows: 
- Click on "New Pub/Sub" and select a new AwsThingPublisher from the list. Assign it a name (e.g. demo.publisher)
A new Thing Publisher will be associated to this Cloud Connection. Select the newly created publisher and configure it with a unique topic (e.g. demo.topic) 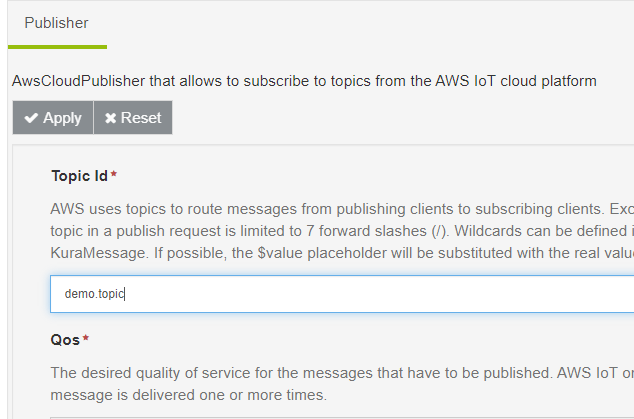
- Navigate to the Wires section
- Add to the Canvas a Timer component and a Publisher component
- Link the components together
- Configure the Publisher component to link to the previously created AWSThingPublisher
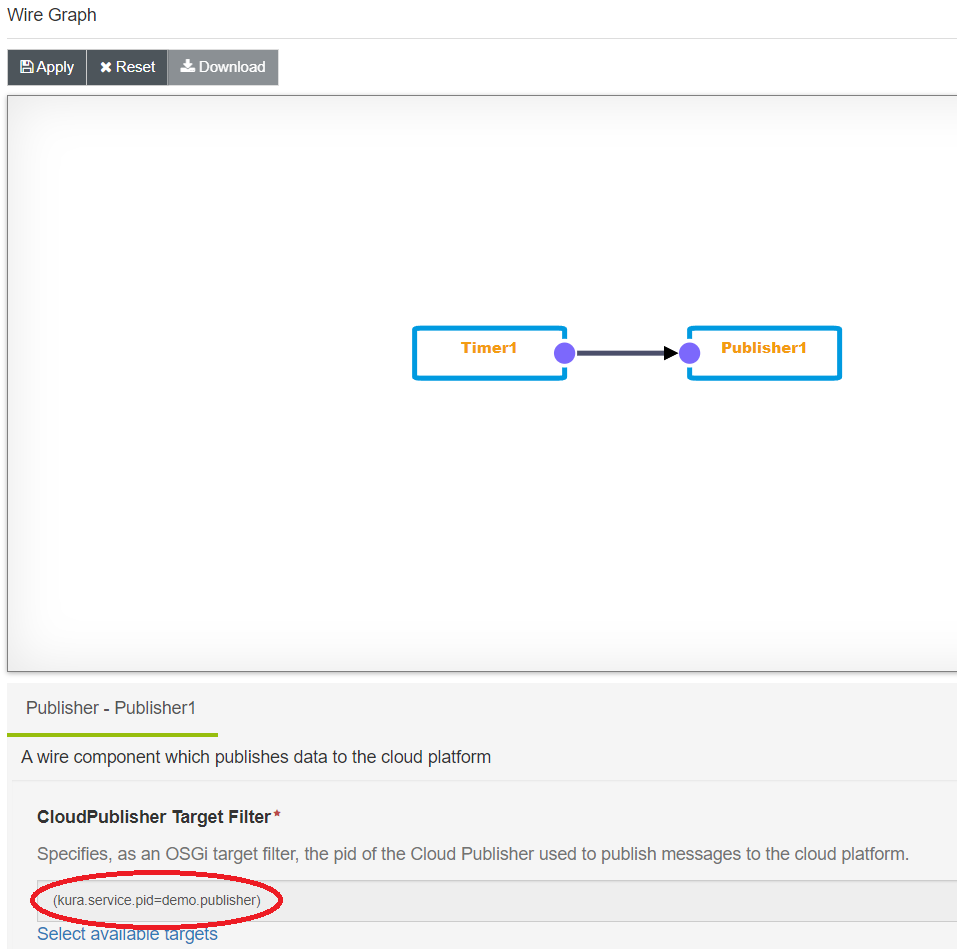
- Apply the changes
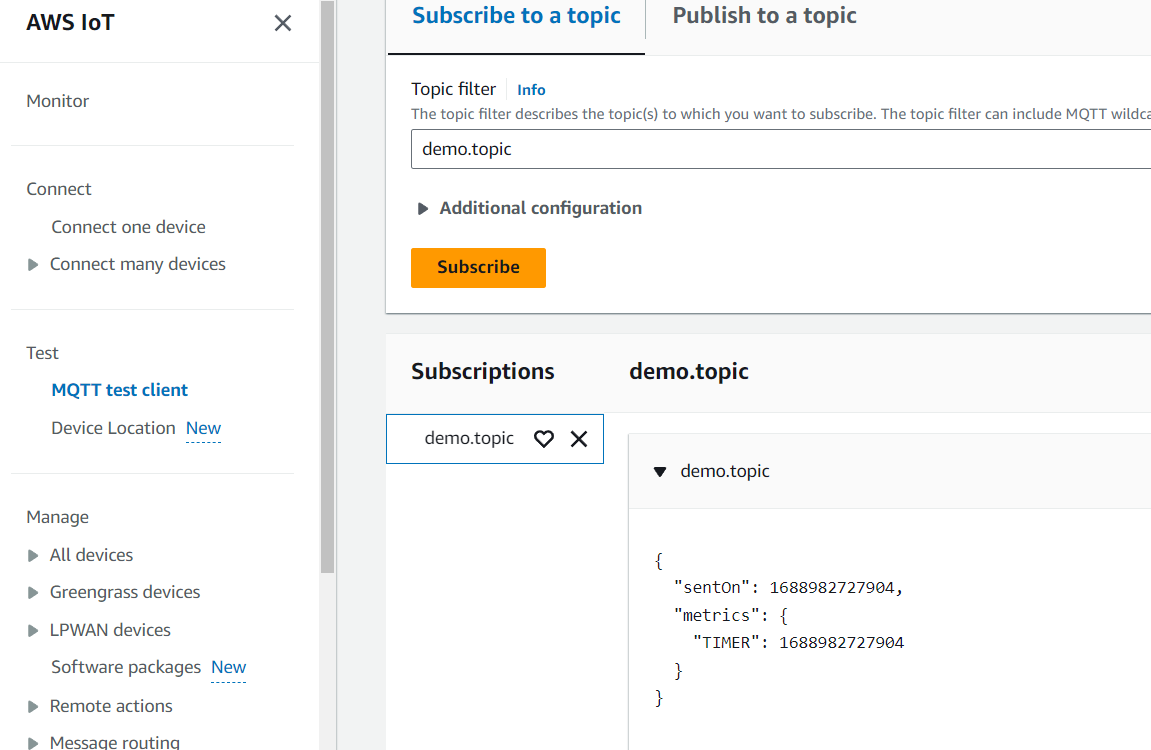
Verify messages in AWS IoT Core
AWS IoT Core will receive periodic timer events directly from the ESF Wire Graph.
- Go to IoT Core in the AWS Console
- Activate the MQTT test client
- subscribe to the topic configured in the AWSThingPublisher (e.g. demo.topic)
AWS IoT Core will receive periodic timer events directly from the ESF Wire Graph.
Debugging and Troubleshooting
Please check the Eurotech Quick Start Guide for DynaGATE 10-14, specifically sections "5 Manage" on how to access the device locally and remotely, and "Troubleshooting" to find a solution to your issues.
Use these links for detailed information on log management and debugging.
Depending on the order code used for your Eurotech device, the system might already be set up for production environments. Refer to the ESF Security introduction to know more about framework execution modalities.
For any issue you might face when working with ESF, feel free to contact the awesome Eclipse Kura community. Chances are the issue you are facing has already been solved!
For detailed documentation, browse the ESF documentation.
If you need support for IoT Core, here it's a link to the FAQs.
And finally, should you need even more support, feel free to open a ticket on our ticketing system.