Securing Your Gateway
Local Web Interface
The ESF Gateway Administration Console default login name and password is admin/admin.
NOTE: Eurotech recommends changing the default password after initial setup and before deployment, as well as limiting access to the ESF Gateway Administration Console to a trusted local network interface using appropriate firewall rules.
Changing the Password in ESF 3.1.x or Later
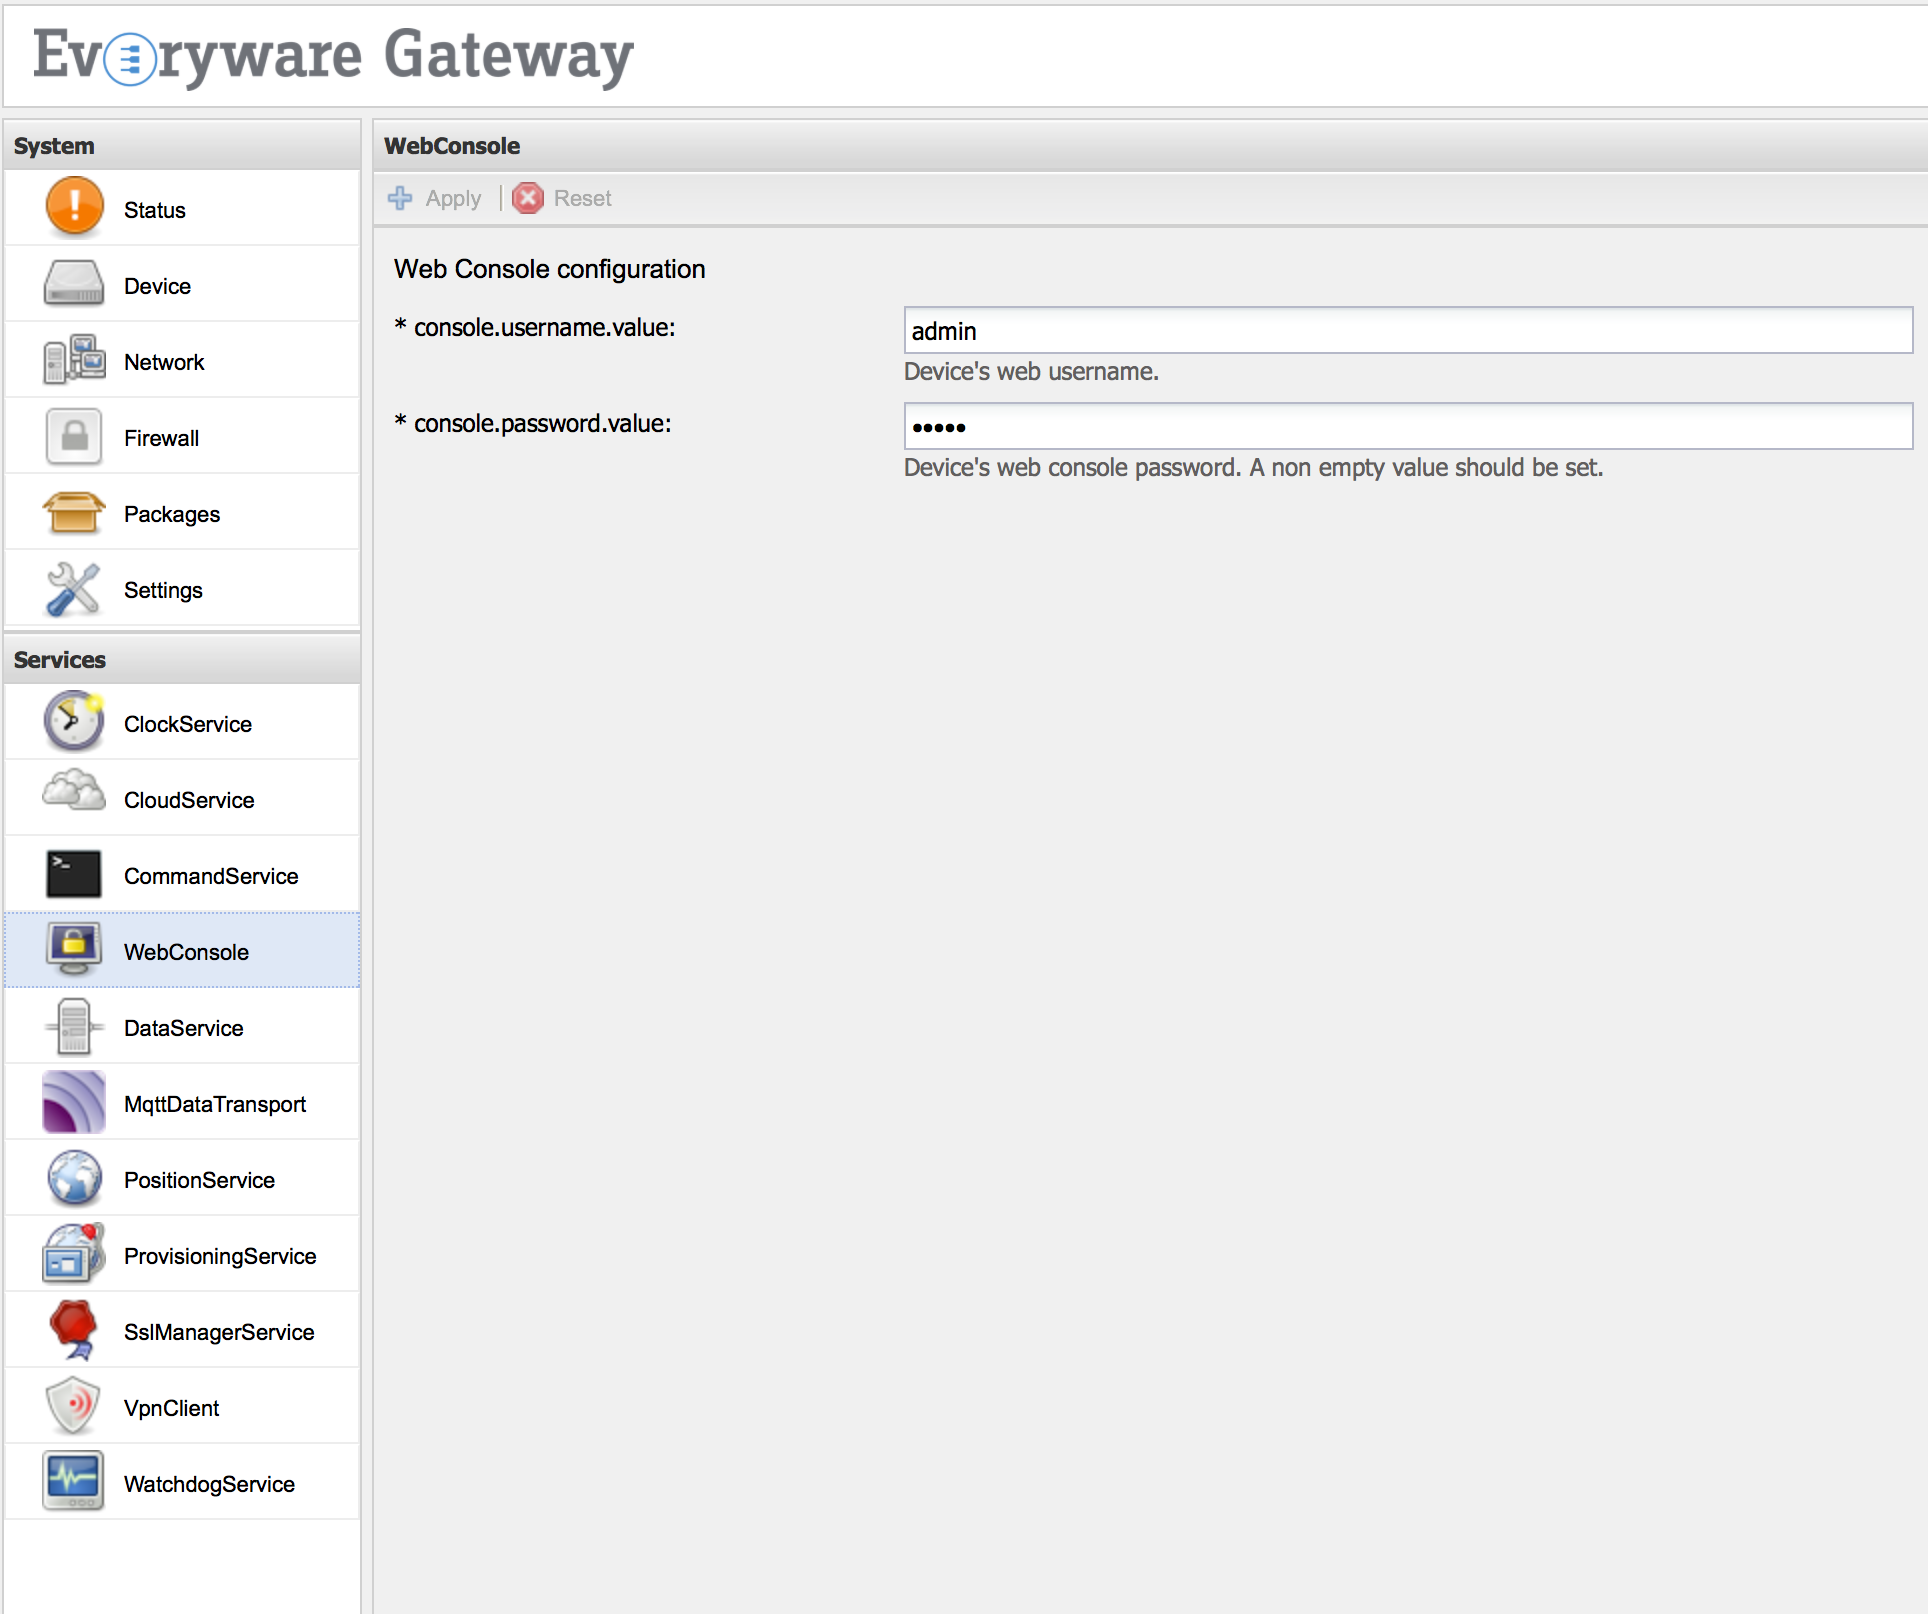
The ESF Gateway Administration Console password may be changed by selecting the WebConsole service under the Services area. Enter the new administration username in the console.username.value and the new administration password in the console.password.value service property and click the Apply button.
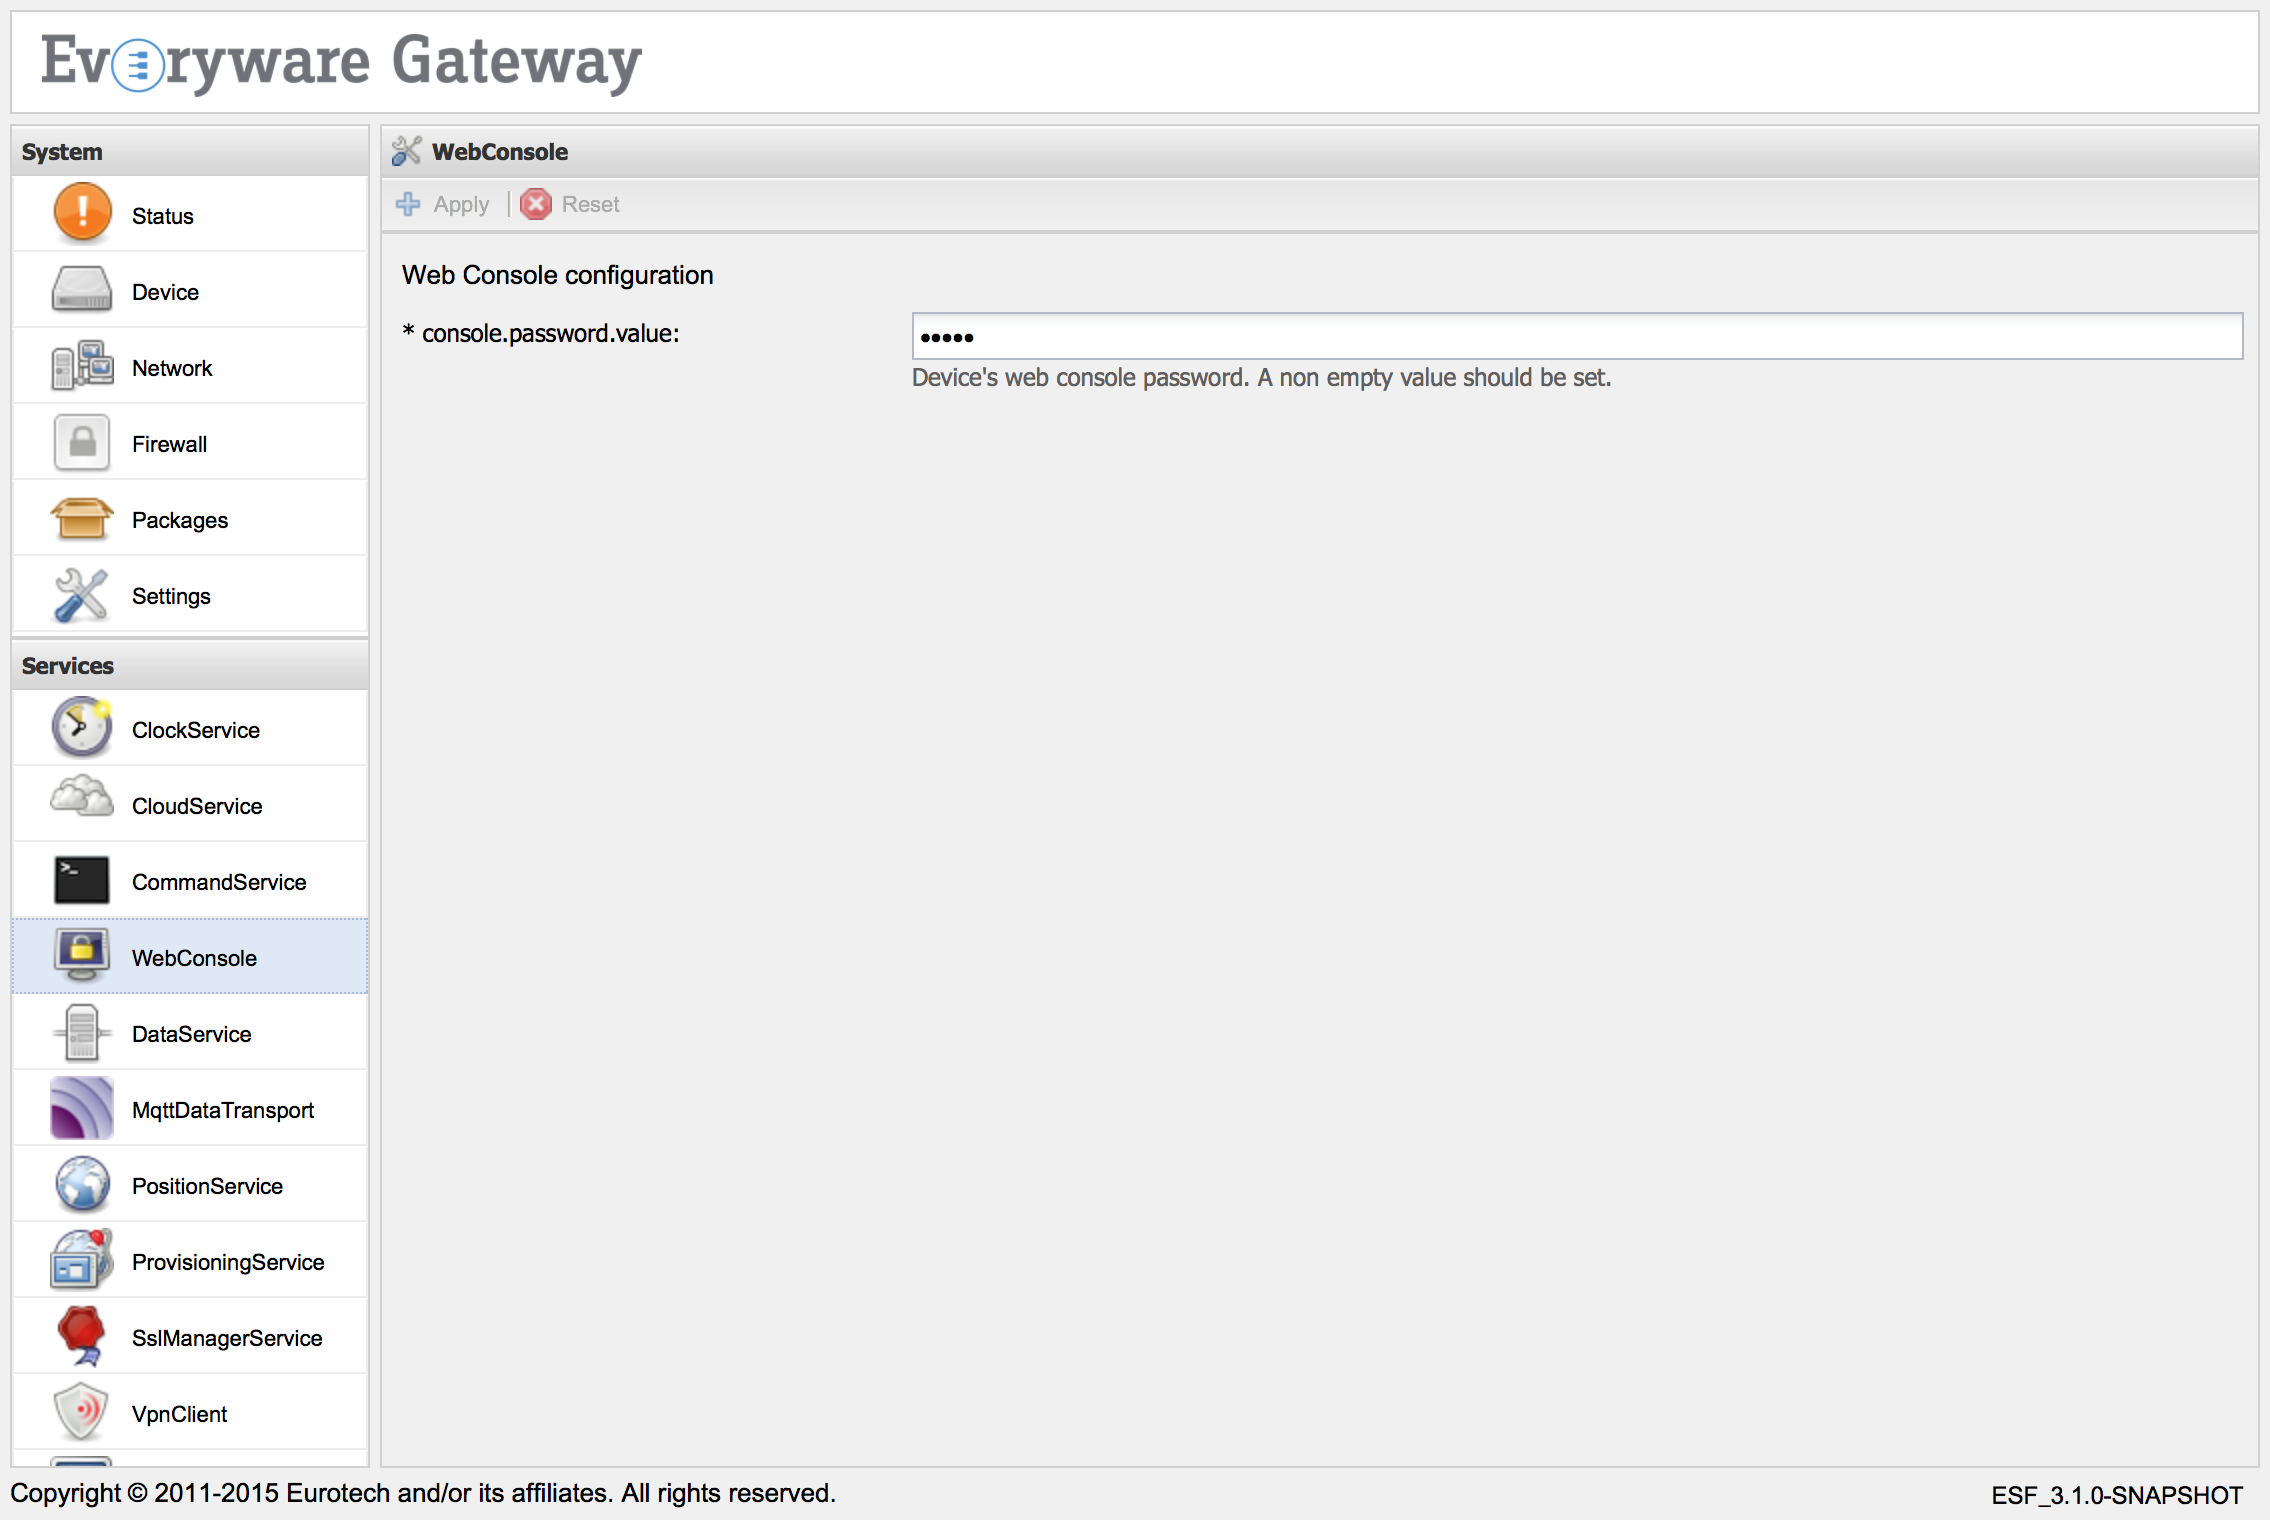
NOTE: ESF 3.1.0 supports only the specification of a new administration password in the console.password.value service property, as depicted in the following picture.
Changing the Password in ESF 3.0.x
The ESF Gateway Administration Console password may be changed by selecting the Settings option under the System area. When the Settings option is selected, the Settings panel containing Snapshots and Admin Password tabs appears in the main window.
Select the Admin Password tab and enter the Current Admin Password, New Admin Password, and Confirm Admin Password values in the respective text boxes.
Click the Apply button when finished.

ESF 3.1.x Security Features
In order to check the code and the runtime environment consistency, ESF 3.1.x introduces some new security-related features. These features operate at the following levels:
- Code consistency verification performed using JAR signing and specific code obfuscation.
- Runtime environment verification, where the ESF framework code continuously verifies the bundle’s behavior to ensure that access to protected functions is only granted to trusted code.
- Device data encryption and stronger password protection.
- Improved certificates management.
Signed Bundles
ESF 3.1.x checks the JAR signature of the bundles in order to determine the level of privileges assigned to the corresponding bundle. In particular, only the bundles signed by Eurotech, signed with certificates trusted by Eurotech, or signed by specific and trusted entities, can have full access to the functionalities provided by the framework (such as encryption and decryption of content performed by the default provider).
Secured Execution Environment
At every boot, ESF verifies the execution environment checking the code consistency and verifying that the environment from which it is started respects predefined characteristics. The policy defined in ESF 3.1.x specifies that if the framework is not executed within a secure environment, then it will stop itself.
Every installed copy of ESF is strictly coupled with the device from which it is executed. Copying an installed version of ESF from one device to another will make it impossible to execute the framework.
Encrypted Snapshots
ESF 3.1.x introduces a new snapshots encryption function where every snapshot is AES encrypted, using a 128-bit password that is runtime calculated. Within every snapshot, the passwords are encrypted to provide a higher level of data security.
With this feature, every time ESF boots, it checks the consistency of the snapshots resident on the disk. If tampering is detected, the framework stops executing.
Every snapshot is device specific; therefore, even if the snapshot is copied from one device to another, the destination device will not be able to decrypt the file.
Encrypted Passwords
ESF considers passwords to be the most important type of data, as reflected by the fact that passwords are always managed and passed as encrypted objects. For example, as previously introduced, passwords are encrypted when inserted into a snapshot. Furthermore, every bundle that has passwords in the metatype receives the passwords fetched from the snapshot as encrypted objects. In these cases, every bundle requires the decryption of these objects in order to obtain a fully usable object.
The security rules introduced in ESF 3.1.x allow the decryption of data only for bundles that respect predefined characteristics. In this way, a malicious bundle cannot substitute the regular bundle and try to cheat the passwords.
SSL Certificates Management
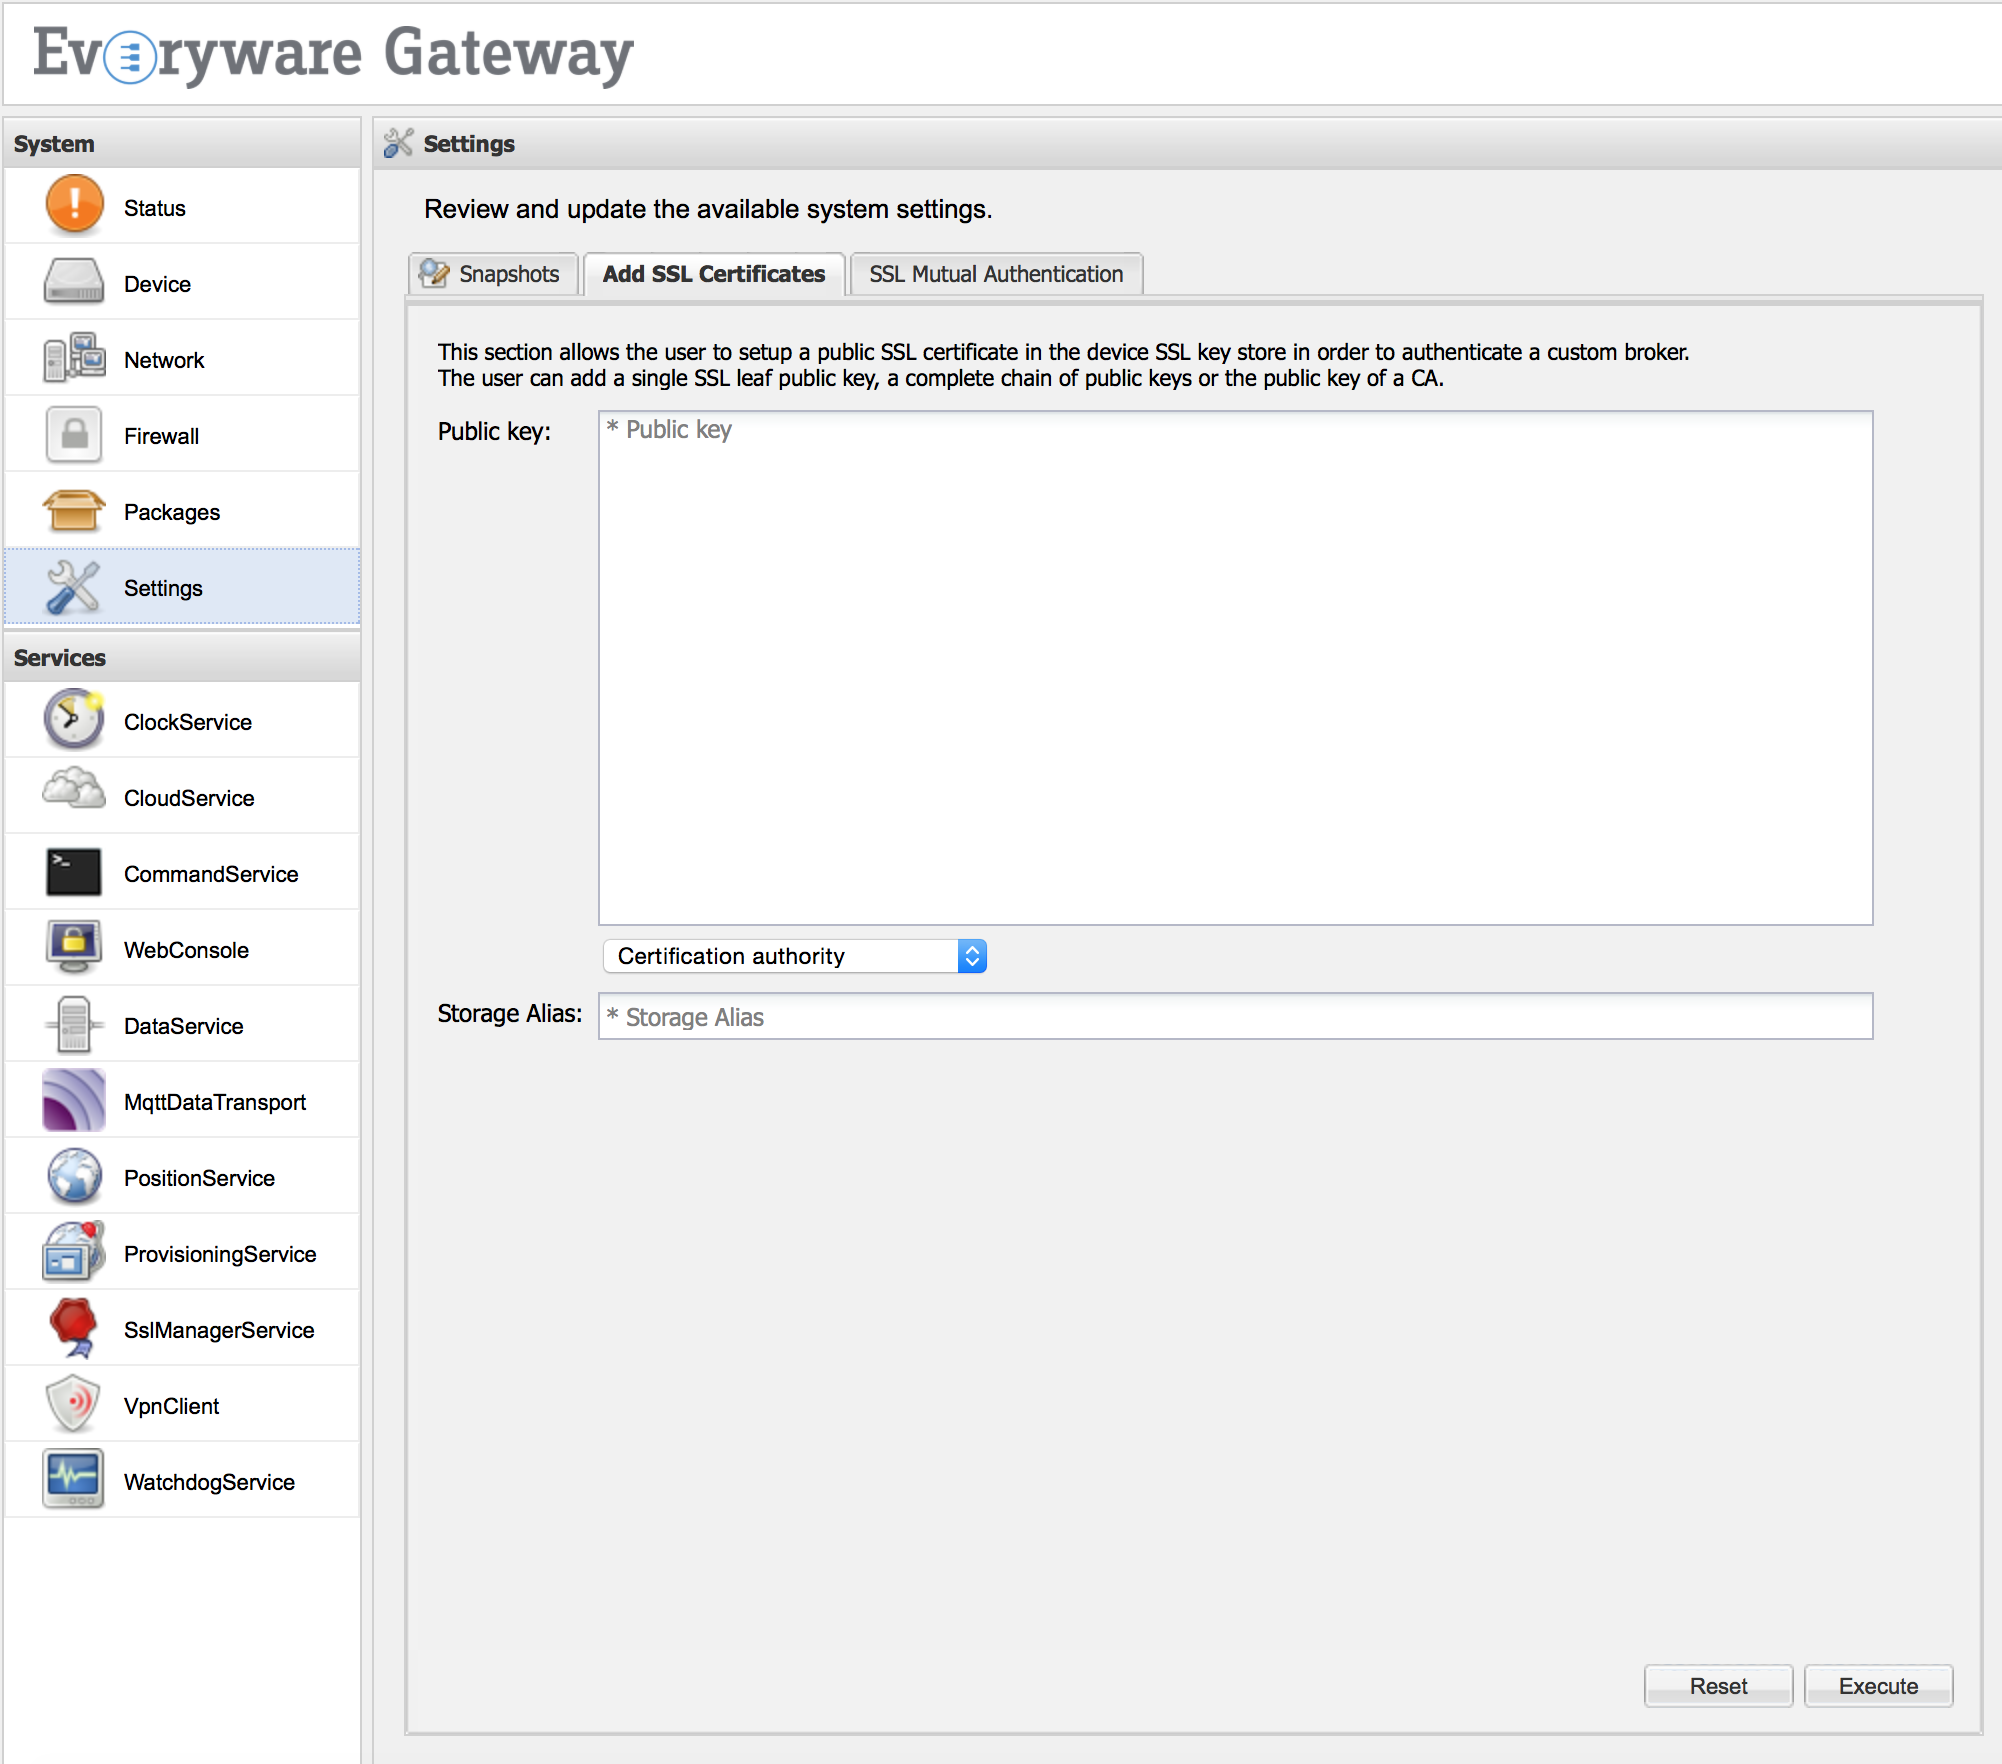
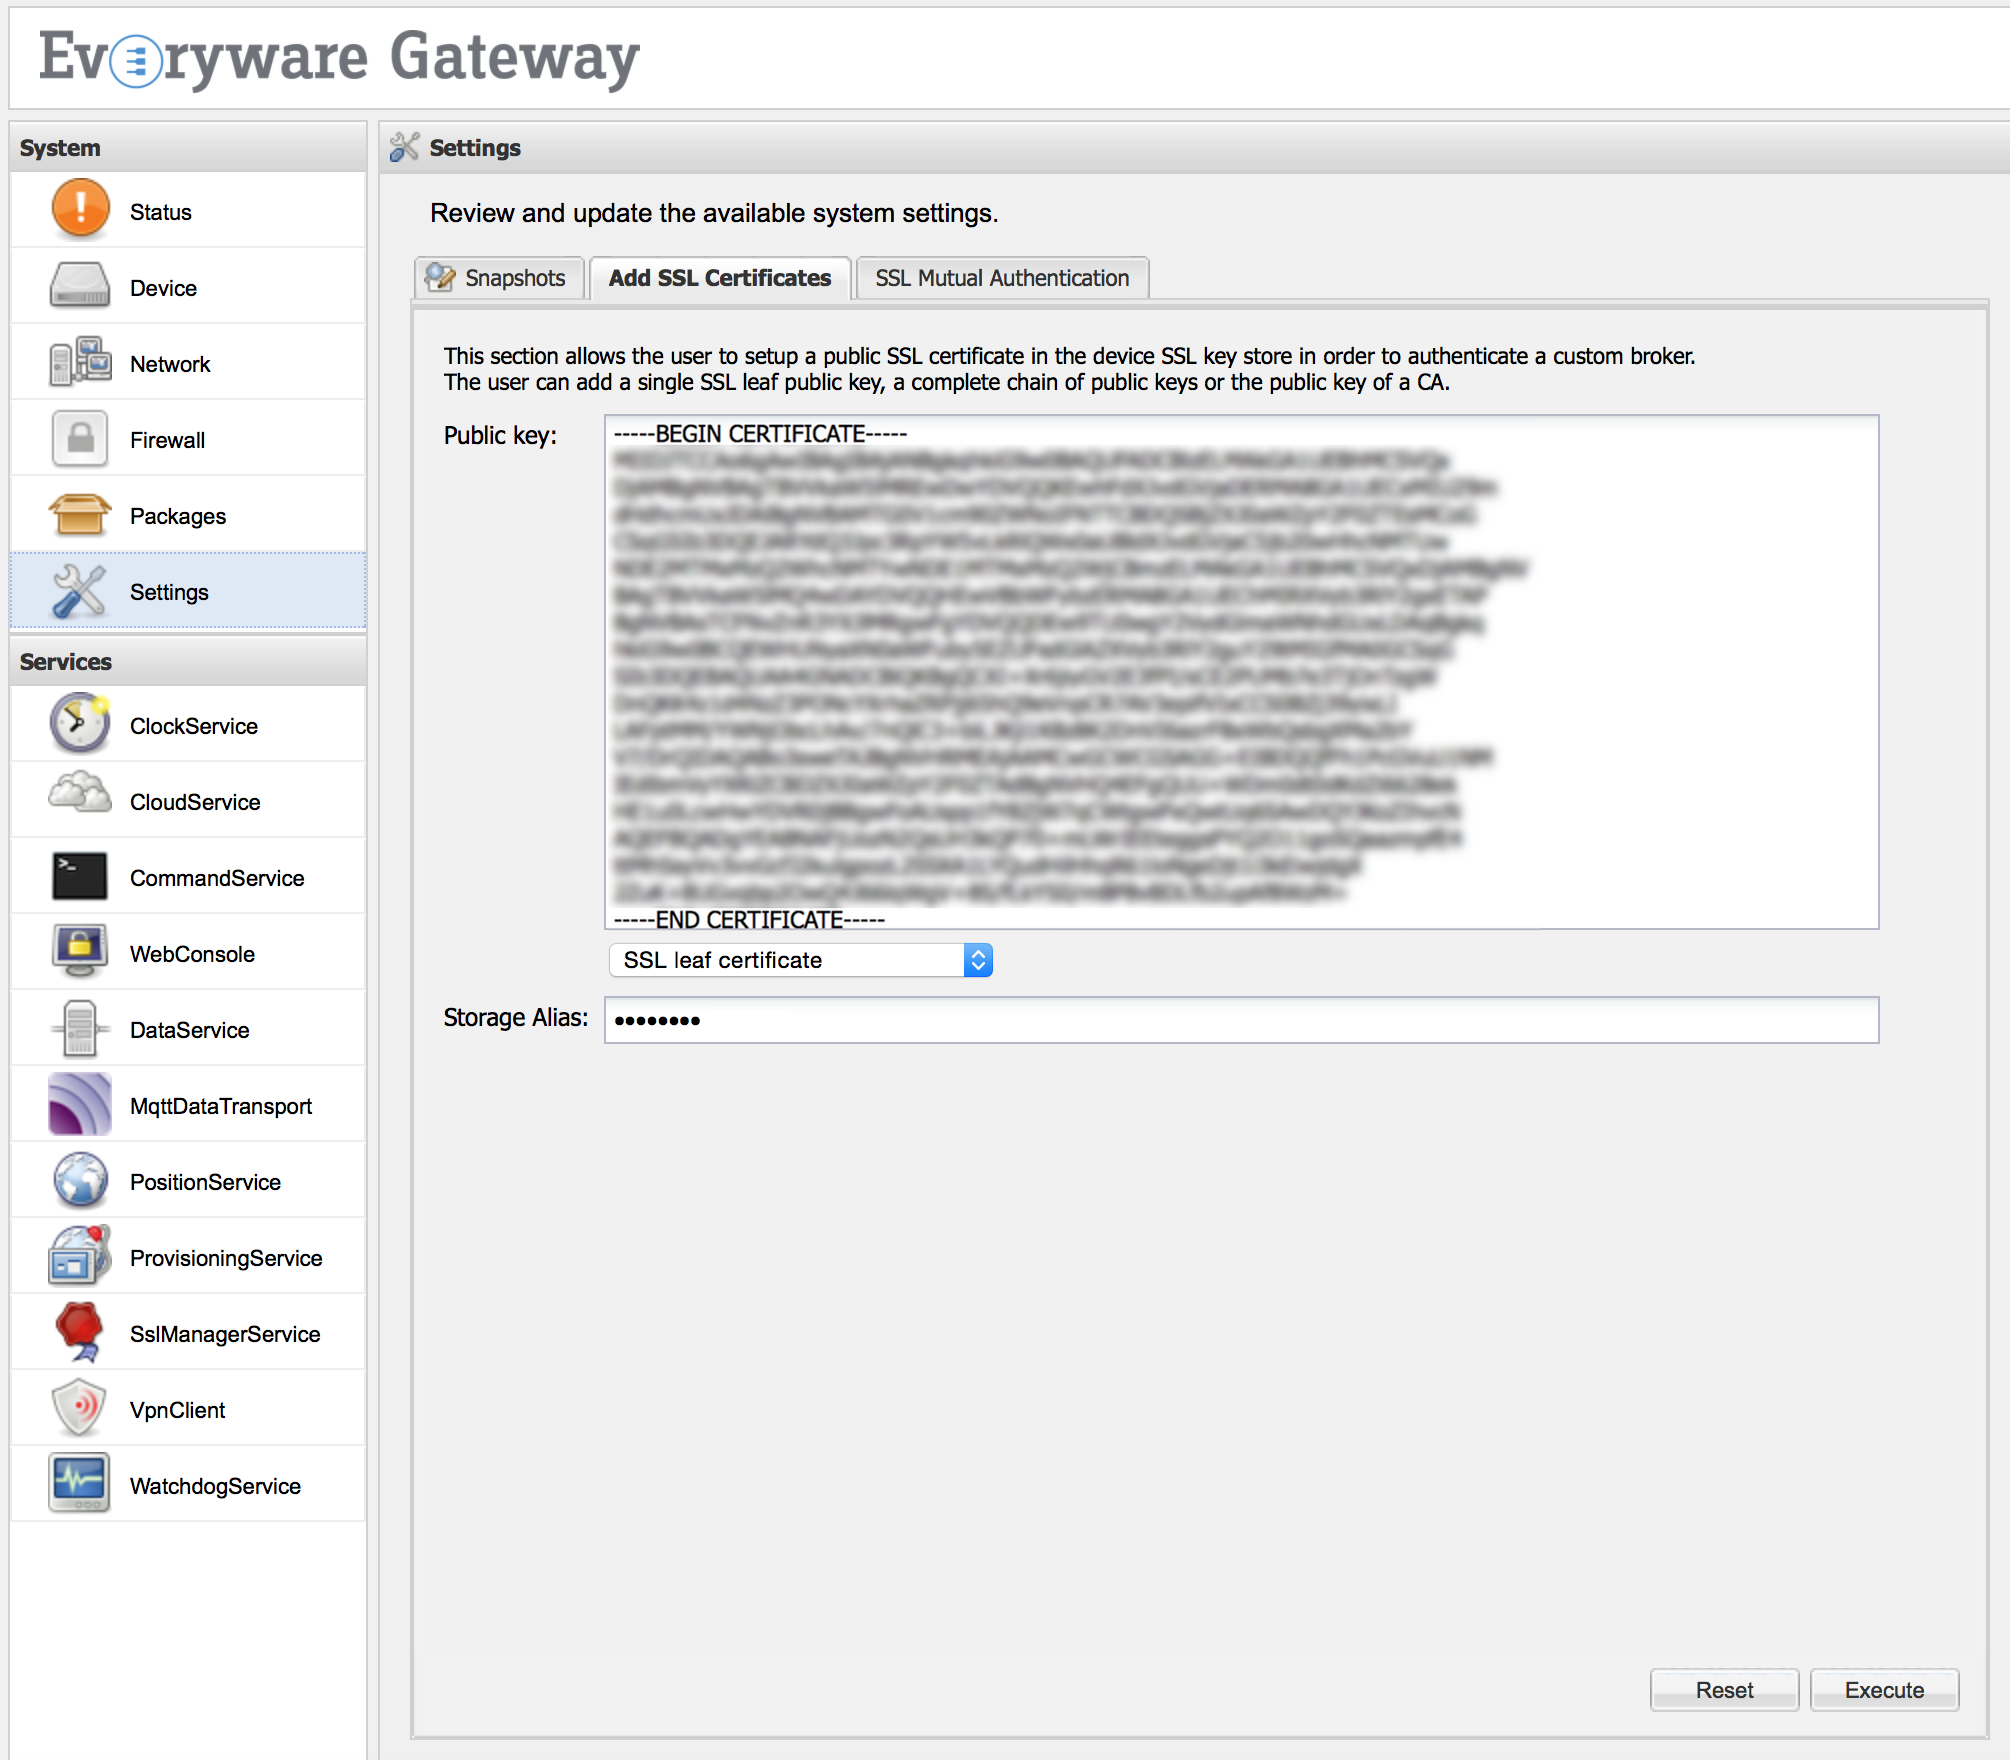
Two new administrative functionalities is available under Settings and called respectively Add SSL Certificates and SSL Mutual Authentication. The first feature simplifies the process of keystore updating to add a public key or a chain of public keys, that are used to authenticate the broker. The update can be performed filling the following fields:
-
Public key - a text area where the user can paste the public key(s) that will be added to the SSL keystore. (Required field.)
- a drop down window where the user can select the type of key to add. Possible fields are:
- SSL leaf certificate - if the user wants to add a single key.
- SSL complete certificate chain - to add a complete chain of public keys.
- Certification authority - to add a certification authority to the keystore.
- Storage Alias - the alias to be used to store the certificates. (Required field.)
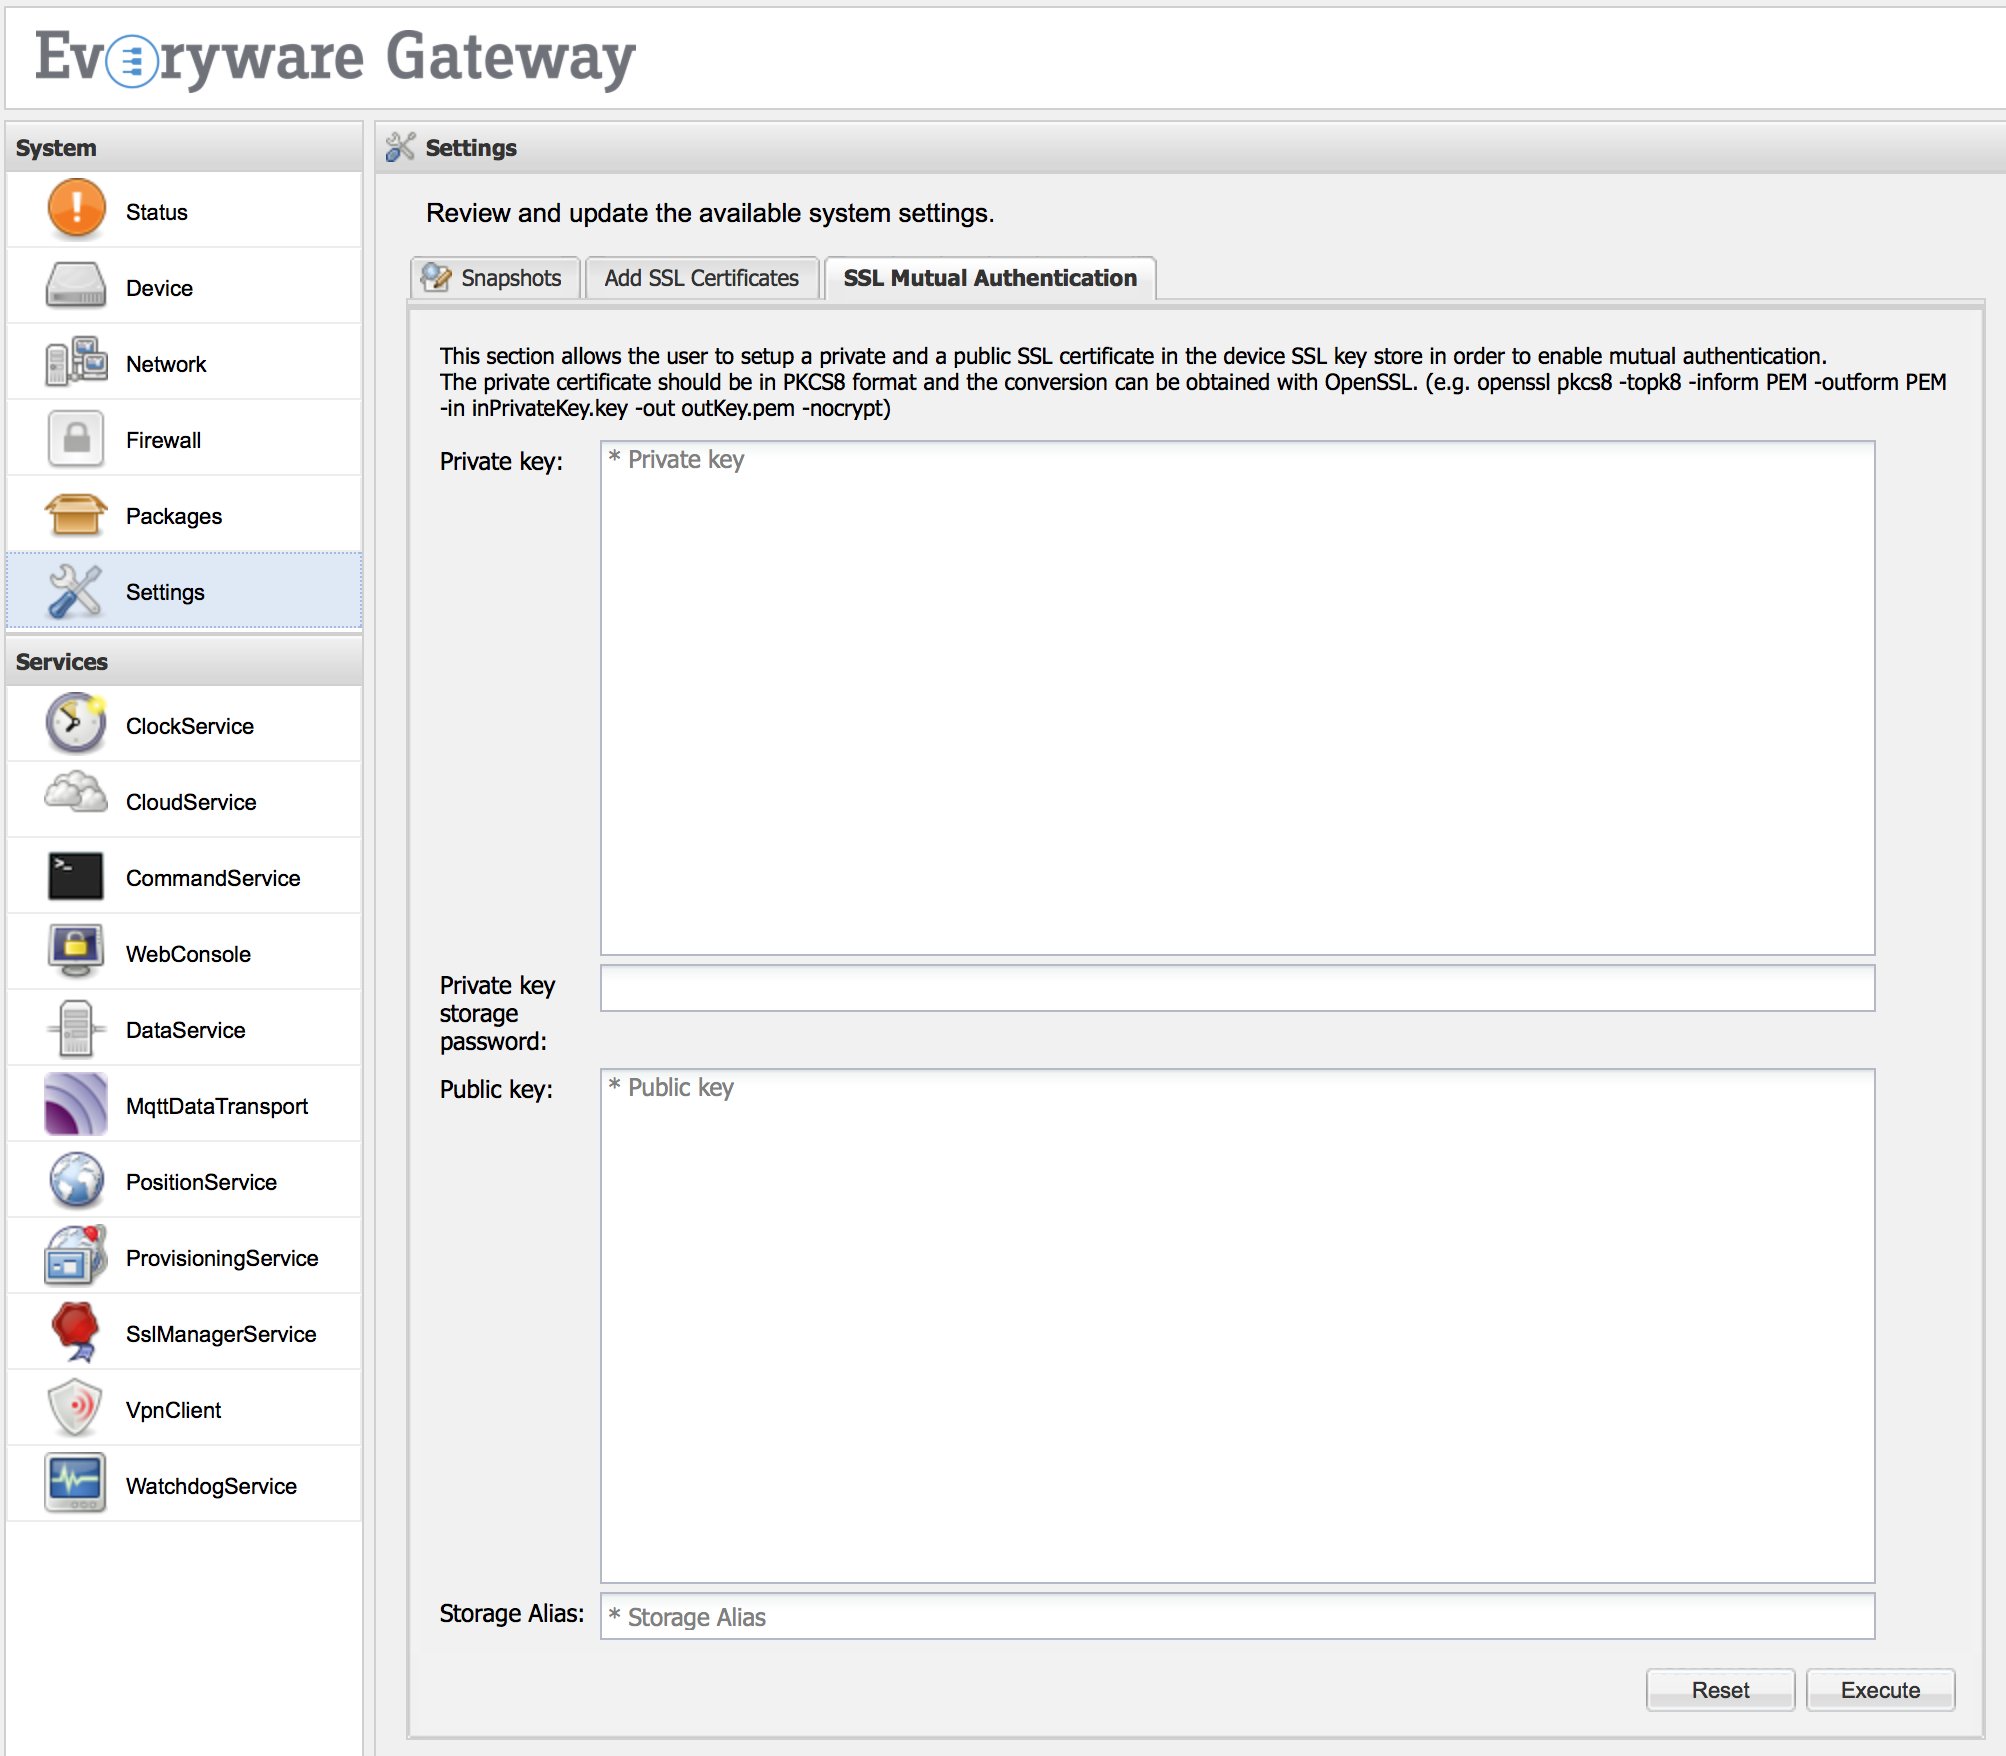
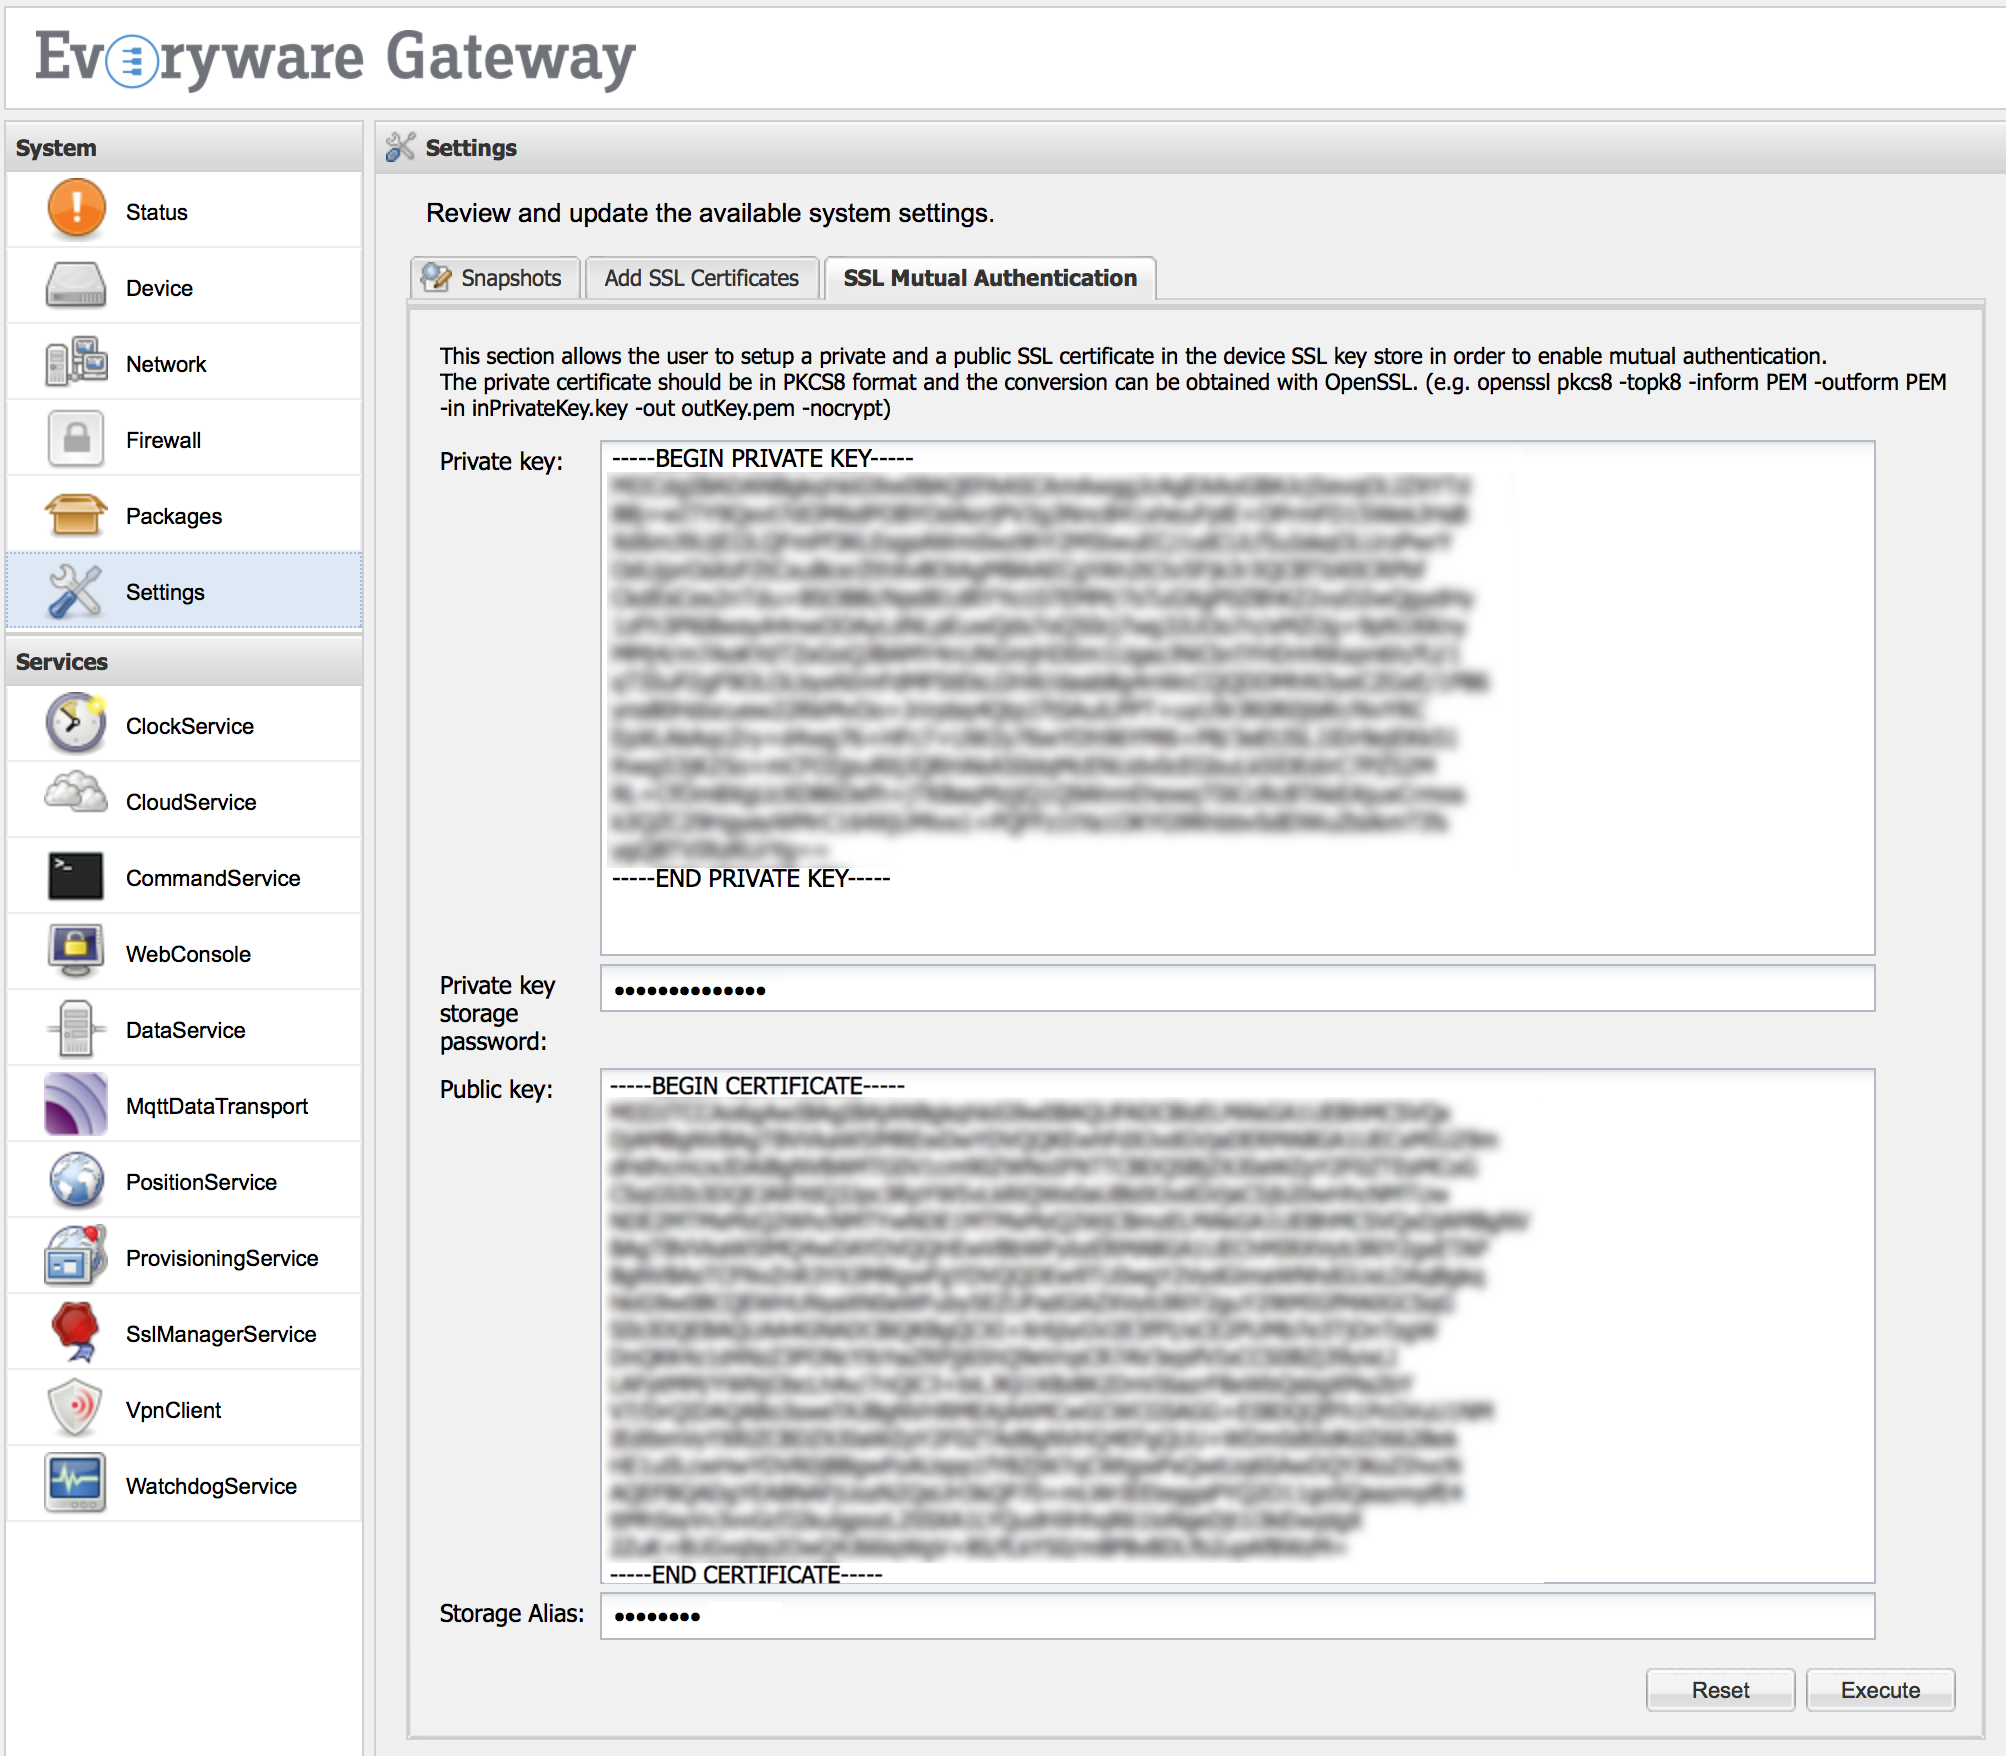
The SSL Mutual Authentication feature allows to add into the device’s keystore a couple of private and public keys, in order to enable the mutual authentication. The update can be performed filling the following fields:
-
Private key - a text area where the user can paste the private key to be added. (Required field.)
-
Private key storage password - the password used to encrypt the private key. (Required field.)
-
Public key - a text area where the user can paste a public key. (Required field.)
-
Storage Alias - the alias to be used to store the certificates. (Required field.)
Cloud Broker Authentication
The device requires a public key in its trust store in order to authenticate the broker and be able to setup an SSL connection. ESF is distributed with a pre-initialized SSL keystore that contains only some of the major Certification Authorities (CA) public keys.
If the broker uses a certificate signed by a different CA, or uses an auto-signed certificate, the system administrator must setup ESF with the correct certificates used to trust the remote cloud broker.
The inclusion of public certificates is accomplished with the Add SSL Certificates feature. To do so, the SSL Certificates form must be completed by providing the public certificate or the public certificates chain to be trusted, specifying a storage password, and defining the alias used to register this new data in the device’s trust store.
In this way, when the device tries to instantiate an SSL connection with the broker, it receives the broker’s public key chain. The SSL connection is secured only if the received chain is trusted. This connection can only happen if one of the certificates that compose the broker chain are available in the device’s trust store.
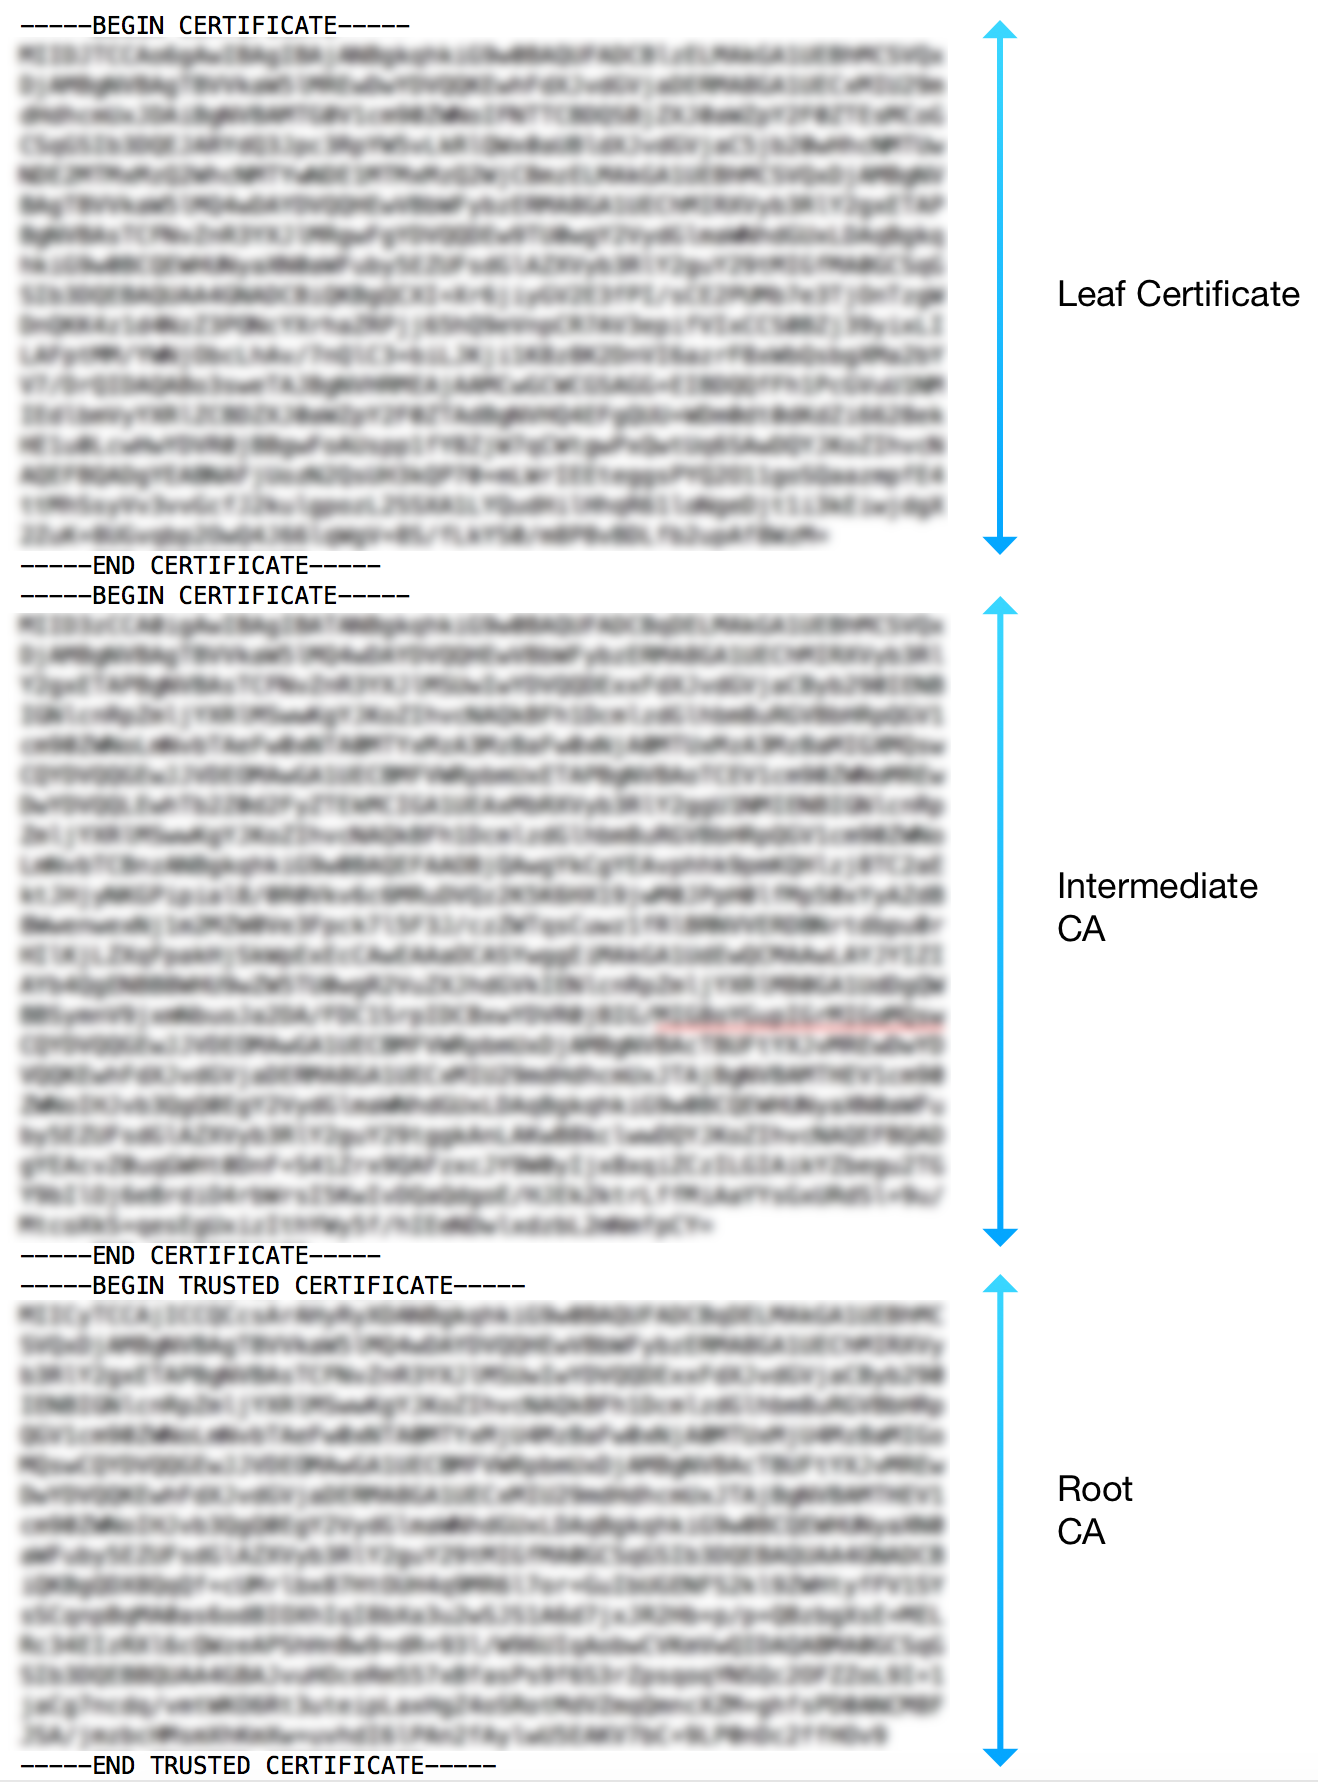
When instantiating the device’s trust store, the user decides whether to add a single certificate (leaf or CA certificate), or to add the full chain.
In the latter case, the chain should be provided by specifying the leaf certificate, followed by the CA certificate that is signing it, and so on, until reaching the root CA. An example of this scenario is depicted in the following image:
Mutual Authentication
Mutual authentication is a technique that allows authentication of the device that is connecting to the broker. The form available in SSL Certificates may be used to specify the keys needed to enable mutual authentication.
This authentication may be accomplished by specifying a couple of certificates (private and public keys) to be used by the client device to authenticate itself to the broker. This authentication is possible because the broker has the root CA certificate that has been used to sign the couple held by the device. In this way, the authenticity of the couple of certificates held by the device may be verified, thereby enabling the two communicating parts (the broker and the device) to trust each other.
To enable mutual authentication, the user must complete the form with a well-formed couple of keys (public and private), with the password to be used to encrypt the private key in the keystore, and with an alias value that corresponds with the account-name used to connect to the broker.
NOTE: To have mutual authentication working, the device certificate must be registered with an alias that matches the account-name field of MqttDataTransport service.
Key Pair Generation
The keys may be generated using specific software, such as OpenSSL https://www.openssl.org or Keytool http://docs.oracle.com/javase/6/docs/technotes/tools/solaris/keytool.html. This section describes how to use OpenSSL to generate a couple of private and public keys.
The private key may be created using the following command-line instruction:
NOTE: Depending on the size of your display window, you may need to scroll across to the right in order to view the instruction in its entirety for the commands provided below.
openssl genrsa -out certsDirectory/certs/certificate.key 1024
This instruction creates a new, 1024-bit private key in the specified path.
This key is used to generate a Certificate Signing Request (CSR) file, which is used by a CA to authenticate the certificate’s creator.
A CSR file is created with OpenSSL using the following command:
openssl req -new -key certsDirectory/certs/certificate.key -out certsDirectory/crl/certificate.csr
If the user is creating their own certificate chain, the CSR file may be signed using a personal CA. This process may be accomplished using OpenSSL with the following instruction:
openssl ca -config certsDirectory/openssl.cnf -days 3650 -keyfile certsDirectory/ca/ca.key -cert certsDirectory/ca/ca.pem -out certsDirectory/certs/certificate.pem -infiles certsDirectory/crl/certificate.csr
The parameters are defined as follows:
-
-config - is used to specify the OpenSSL configuration file that must be used to sign the certificate.
-
-days - is used to specify how long the certificate is valid.
-
-keyfile and -cert - allow the specification of the CA that will sign the CSR file.
-
-out - specifies the location and the name of the signed certificate that will be created.
-
-infiles - specifies the location of the CSR file that has to be signed.
NOTE: The private key may not be placed into the ESF Gateway Administration Console without a format conversion. OpenSSL offers the following instruction to convert the input private key to a non-encrypted PKCS#8 format that may be processed by the ESF code.
openssl pkcs8 -topk8 -inform PEM -outform PEM -in inPrivateKey.key -out outKey.pem -nocrypt